Voice Management Guide
The Voice Management user guide
Integrating payment IVR with Voxpay
1 - Linking the Voice Management app with Voxpay
Configuring users
Go to the Voxpay administration interface > Configuration > Users: All the users you are about to create must have the same email address as the operators in the Axialys administration interface.
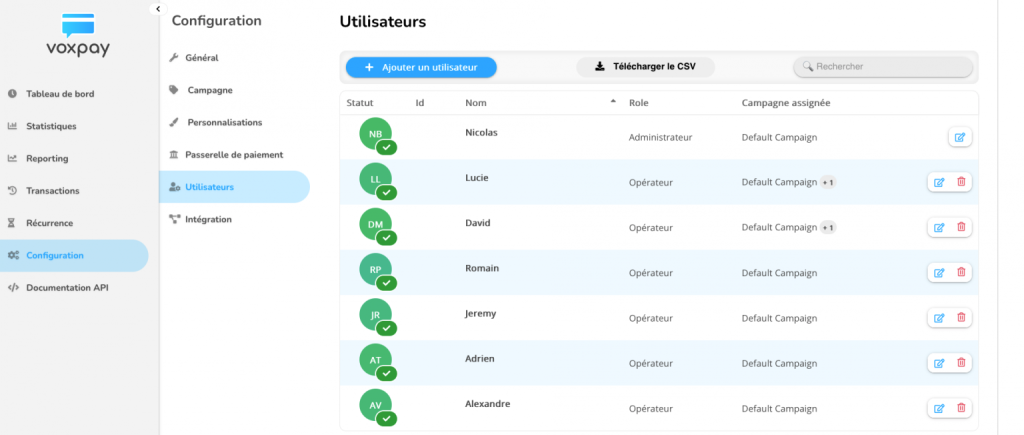
You need to create an admin user > Tick the box “Tick this box to generate a new API token” > this API will be used in the steps below.
2 - Set up the payment method
To set up your payment method, go to your administrator interface, the “integration” menu and then the “Voxpay” tab.
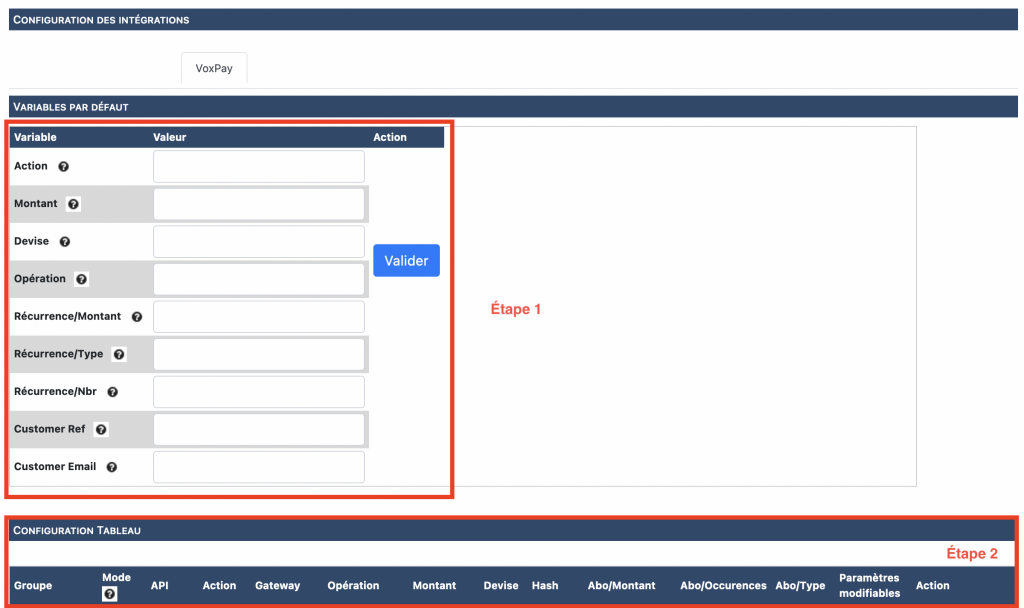
Step 1 – Name the default variables
Name the different variables that you are going to use in the IVR to set up your Voxpay service:
Action: enables you to set the payment method: direct payment or subscription. If subscription is chosen, the subscription will start immediately.
Amount: enables you to set the default amount for the transaction.
Currency: enables you to set the transaction’s default currency.
Operation:
Authorisation: enables you to make a call without paying (to run a test for example)
Authorisation + Capture: enables you to make a call with payment
Tokenisation + Authorisation + Capture: Enables you to make a call with bank card backup for later payments using immediate direct debit (compulsory for subscriptions).
Tokenisation + Authorisation: enables you to make a call with bank card backup without any immediate card debit but for subsequent calls.
(All recurrences below are related)
Recurrence/Amount: Used to set the direct debit amount during a subscription. You can, for example, enter the price of the app fees in “Amount” and recurring subscription fees in “Recurrence/Amount”.
Recurrence/Type: enables you to set the type of subscription: Daily, weekly or monthly.
Recurrence/No.: Used to determine the recurrence of the subscription type: For example every two weeks, every two months, etc.
Customer Ref: enables you to enter an accounting code that you give the bank during a subscription.
Customer Email: enables you to enter the customer’s email address (to send the invoice for example).
Step 2 – Configuring your IVR
When you have set all the different variable names, you will be able to insert them into your IVRs so that you can use them during a call. If you do not enter a corresponding variable in the IVR, the “Voxpay” button will not appear on the operator banner.
Insert a variable step before the group corresponding to the variables named in step 1. You do not have to use all the named variables.
Example of IVR with Voxpay:
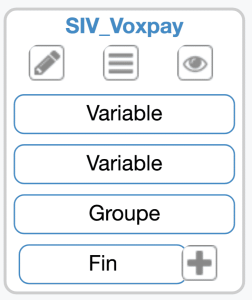
The first variable is the amount that you set as default. This sum can be changed by the operator during the online transaction if they have the permission to do so.
Variable name: Use the title entered in the integrations page.
Value: Enter the default amount between two apostrophes (ex: ‘3’).
The second variable is the default currency used during transactions. This currency type can be changed by the operator during the online transaction if they have the permission to do so.
Variable name: Use the title entered in the integrations page.
Value: Insert the default currency between two apostrophes (ex: ‘EUR’).
Finally, insert a “group” step.
Step 3 – customising configurations based on groups
In “Table configuration”, you will be able to customise all the settings by group for those groups involved in payment via Voxpay.
Group: Group to which the settings apply.
Mode:
Default: Let the operator choose the payment method during the call (Online or IVR),
Online: The operator enters the operations that need carrying out,
IVR: The IVR indicates the operations that need carrying out via voice messages.
API: This API will link your Voxpay solution to the Axialys IVR. Copy/paste the API key from your Voxpay administrator interface.
Action: See the details about this in step 1
Gateway: Copy/paste the gateway ID from your Voxpay administrator interface.
Operation: See the details about this in step 1
Amount: Enter the amount that can be set by default for this group
Currency: Enter the currency that can be set by default for this group
Hash: Copy/paste the hash salted password from your Voxpay administrator interface.
Subscription/Amount: Enter the amount that can be set by default for this group
Subscription/Occurrences: Enter the occurrence that can be set by default for this group
Subscription/Type: Enter the type that can be set by default for this group
Modifiable parameters: By ticking the box you enable operators to change the default settings during a call.
Action: Used to validate the settings or delete the line.
3 - Payment via the operator banner
When you are part of a group of operators who are in the payment IVR, an additional button appears on your banner during incoming calls.
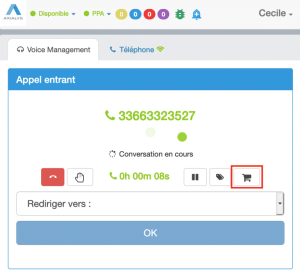
During a call, if you need to make an online payment, click the “payment” button.
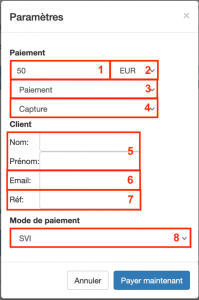
A popup enables you to change the payment to suit the caller’s needs if you have the permission to do so.
1 – Enter the transaction amount
2 – Enter the currency
3 – Indicate if it is a one-time payment or a subscription
4 – Enter the payment action
5 – Enter the caller’s surname and first name
6 – Enter the customer’s email address if it’s a subscription
7 – Enter the transaction reference
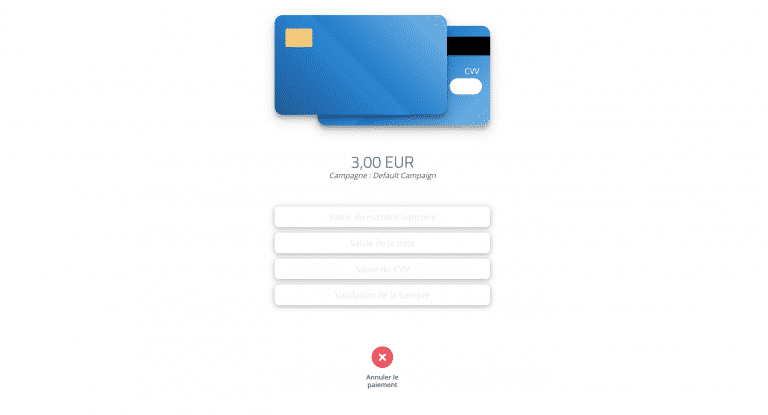
8 – Choose the payment method:
IVR: The form is completed via the IVR. The operator can still follow the steps via their interface and resume the call whenever they want,
Online: The operator stays on the phone with the caller and it is up to them to enter the different steps to follow,
Text message: The operator remains on the phone with the caller and the link is sent by text message.
- Table of contents