Voice Management Guide
The Voice Management user guide
Call management
Receiving a call
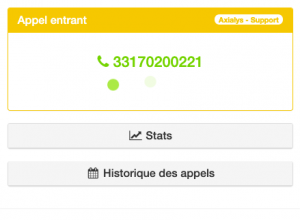
When you receive an incoming call, your toolbar will notify you of this call, informing you of:
The group to which the call was received (by displaying the colour of the group and the name of the group)
The caller’s waiting time: how long the caller waited prior to being connected to an operator (you can choose whether or not to activate this feature via the administrator interface).
Your telephone will then ring and you will have to pick up your phone in order to answer the call.
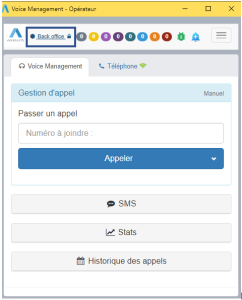
Placing a call
To place a call, you must fill in the “Number to be dialled” field, without leaving spaces between the numbers, select the skills queue and click on “call”.
Selecting a skills queue will allow you to adapt your call in relation to the selected queue. Specifically, the number displayed or the on hold music will differ depending on the selected queue.
You can call a contact that you have imported into your administrator interface directly, by typing the name of this contact and selecting the number to be called.
3 - The ongoing call toolbar
Action during a call
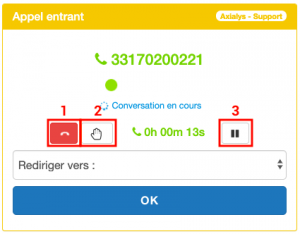
When you are on an ongoing call, whether an incoming or an outgoing call, several actions are available via your toolbar. You can:
Hang up the call,
Place the call on hold (the hand then becomes orange) and resume it (the hand then turns white)
Start (the rectangle is red) or stop (the rectangle is white) the recording of the call
Transferring a call

If you receive a call, you can transfer it. All you have to do is click on redirect:
To an external no.: allows you to transfer a call to an external number. Once the number has been filled in, the call will be automatically transferred.
To a supervised external no.: allows you to transfer a call while first being able to speak to the recipient. Click once more to transfer the caller to the new contact.
To the Centrex extension: allows you to transfer the call to the Centrex extension. By default, transfers to Centrex extensions are supervised transfers. Hang up your phone to transfer the call. You can enter the name or short number of the Centrex contact.
To the operator: allows you to transfer the call to another available operator. Only available operators will be displayed in the drop-down list.
To the supervised operator: allows you to transfer the call to another available operator, while first being able to speak to that operator. Click once more to transfer the caller to the new contact.
To step: allows you to transfer the call to another step of the platform.
To directory: in the administrator interface, you can import a directory of contacts outside the company. Search for these contacts via your operator toolbar by typing the first few letters of the name entered when importing the file.
When transferring a call, the “Resume” key allows you to resume the call during the transfer, if the recipient is not responding.
4 - Call status
A call can have various statuses:
– “abandoned”: a call that has been hung up by the caller during navigation on the IVR
– “cancelled”: a call that has been hung up by the caller during operator extension ring time
– “unanswered”: a call missed by the operator, with the caller returned briefly to the on hold music
– “engaged”: call transmitted to the operator, but his/her extension is engaged (for example if he/she is on a call outside of Voice Management), with the caller returned to the on hold music
– “answered”: call answered by the operator
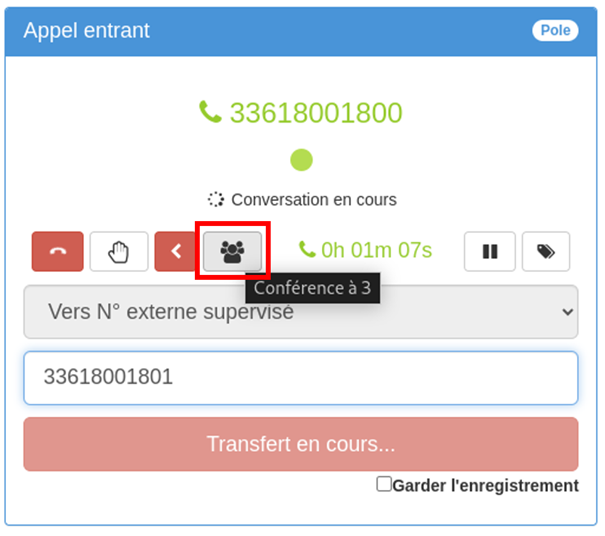
5 - Making a 3-way conference call
In the context of a supervised transfer, you have the option to simultaneously integrate three participants into the conversation: the caller, yourself (the agent), and the person to whom you are transferring the call.
To do this, follow the steps below:
- Initiate the supervised transfer.
- Use the “Conference” button: Once you are connected with the recipient of the transfer, click on the “Conference” button. By activating this option, the initial caller (who is on hold), yourself, and the recipient of the transfer will all be connected in the conversation.
- Managing disconnections: If any of the three participants (the caller, yourself, or the recipient of the transfer) hangs up, the call will remain active for the other two participants.
6 - Choose an automatic post-call pause
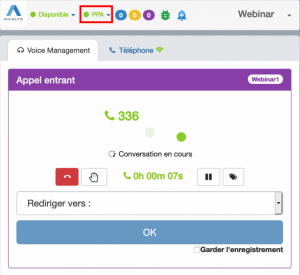
When you are on a call, a drop-down menu is displayed next to the status of the operator banner. This “PCS” option, which means “Post Call Status”, enables you to choose a status that your banner will be set to when you end the call.
This means, for example, that you will definitely be on hold before an incoming call arrives.
7 - Information of the blocking of a status
If a supervisor locks an agent in a specific status (available or on break), the agent will be informed of this on his banner.
Indeed, a small lock will appear on the right of his status.
- Table of contents