Voice Management Guide
The Voice Management user guide
- To start
- Prerequisite
- Home
- Administrator
- Importing sounds to your IVR
- Creating a routing
- Importing a directory
- Prohibit transfers to certain numbers
- Creation of a skill group
- Creation of an operator toolbar
- Gestion of an operator
- Creation of an IVR
- Satisfaction survey
- Campaign
- Webcallback
- Link WebCallBack
- Generating a WebCallBack link
- Gestion of a supervisor
- SMS service
- SMS in the operator toolbar
- SMS in the operator toolbar
- Statistics
- Operator
- Supervisor
- Technical side
- API
- SSO authentification
- Call recording
- Integration
- Application setup (Microsoft Dynamics)
- easiware integration
- Salesforce
- Zendesk
Creating a routing
1 - Creating a routing
In your IVR, you can set up a routing. This will allow you to forward one number to another.
Routing can be set up if you have an on-call number, for example. If your support team takes calls until 6:00 pm but you still want to be accessible after this time, you can transfer all calls to your on-call number, without being obliged to share this number.
To set up your routing, go to the “Routings” tab in your administrator interface. Click on “Add a routing”. You will be able to fill in the following information:
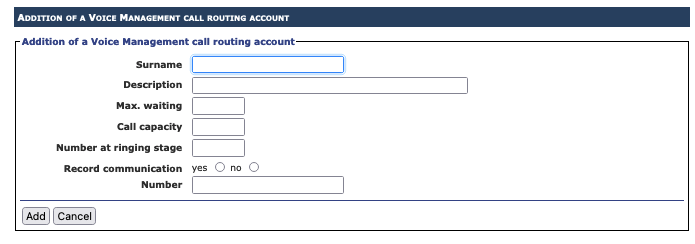
- Name: give your routing a name,
- Description: the description of your routing can be the same as the name,
- Max. on hold: corresponds to the maximum number of people who can be on hold prior to being dealt with by your routing phone,
- Capacity on calls
- Ring number: corresponds to the number of times the routing phone will ring,
- Record the communication: you can record your communications. Note: the person who responds to the routing phone will not be able to stop the recording of the call.
- Number: the number to which you want the call to be redirected.
Save your routing by clicking on “add”.
2 - Link your routing to an IVR
Once you have saved your routing, by clicking on “add” and go to the “Step” tab.
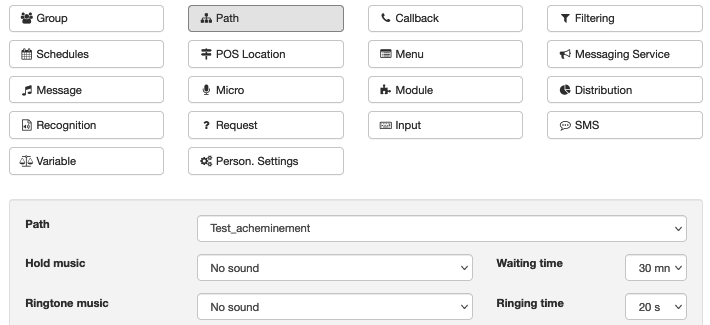
Create a new step and click on “new stage”, select “Routing”. You will be able to configure your routing by filling in the following fields:
- Routing: In the drop-down menu, select the previously created routing.
- On hold music: select the on hold music for the caller
- Waiting time: select the waiting time before the call moves on to the next stage
- Table of Contents