Voice Management Guide
The Voice Management user guide
- To start
- Prerequisite
- Home
- Administrator
- Importing sounds to your IVR
- Creating a routing
- Importing a directory
- Prohibit transfers to certain numbers
- Creation of a skill group
- Creation of an operator toolbar
- Gestion of an operator
- Creation of an IVR
- Satisfaction survey
- Campaign
- Webcallback
- Link WebCallBack
- Generating a WebCallBack link
- Gestion of a supervisor
- SMS service
- SMS in the operator toolbar
- SMS in the operator toolbar
- Statistics
- Operator
- Supervisor
- Technical side
- API
- SSO authentification
- Call recording
- Integration
- Application setup (Microsoft Dynamics)
- easiware integration
- Salesforce
- Zendesk
Creation of tags
1 - Creation of tags
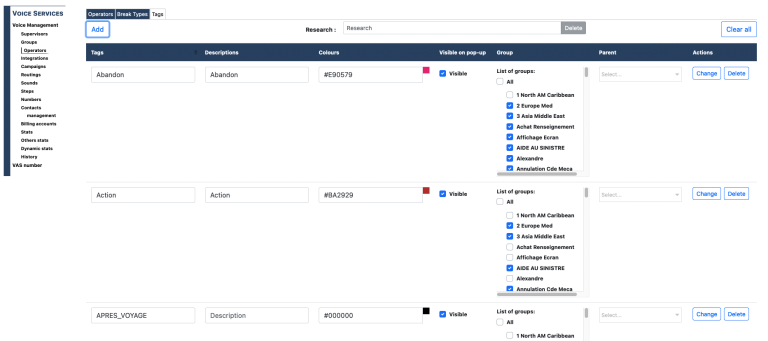
Go to your administration interface, to the “Operators” step, “Tags” tab.
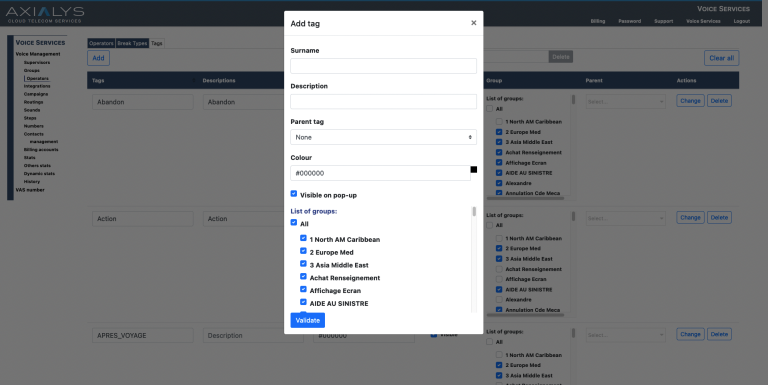
1. Addition form
Click on the “Add” button to add a new tag. Until you create a tag, this option will not appear in the operator toolbar.
Enter the requested information in the form:
Name: Name of the tag that will appear on the toolbar and in the cold statistics. Note: you cannot use accented characters,
Description: Optional, this allows you to provide a description of the tag,
Colour: Select the colour for your tag using either the colour palette or the hexadecimal value.
Visible on the toolbar: Make the tag usable from the operator toolbar by activating this option. If it cannot be used on the toolbar, it will still appear in the administrator interface.
You can change the configuration of the tag at any time. You cannot create two tags with the same name.
Note: if you delete a tag, it will be permanently deleted from your administrator and operator interfaces.
2. The tree of tags
Tree organization:
If you use the tag tree feature, it is possible to categorize your tags. Once a parent tag has been chosen, all the tags that will be its children will be displayed under this tag.
A parent tag will have a bullet point to the left of its title and as it is possible to make several sub-levels , at each new sub-level a new bullet point will be added.
Modify the parenting order:
If you want to reverse the roles between a tag parent and a child tag, you must first remove the parent from its role by going to the “Parent” column of the table and clicking on the cross in the drop-down menu, then modify. and then you can find all the tags in the drop-down menu and find a new parent for it.
List of groups
When you assign a tag to one or more groups, this choice will affect all child tags even if they may belong to other groups.
Filters in statistics and records< /p>
Find the nomenclature of tags and sub-tags in your various filters. Indeed, you will have all the levels of the tags per line, each time taking up the previous tags of the higher level.
2 - Linking tags automatically via the IVR
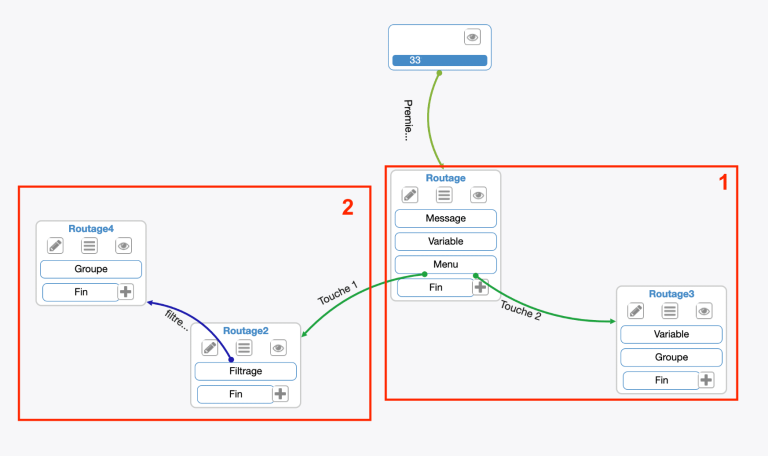
1. Link a tag to a call
You can link tags to a call directly from the SVI. All you have to do is add a tag variable to each step and if the call passed through this step, then the tag will automatically be visible in the operator toolbar.
Go to your IVR, where you want to integrate the tags.
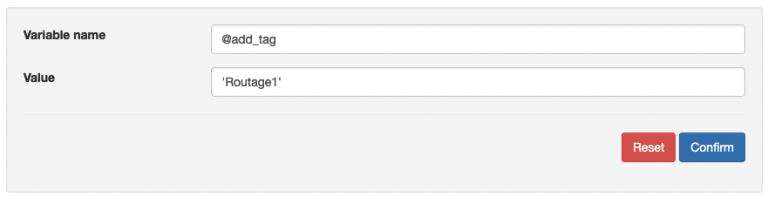
In each step, insert variable as follows:
Variable name:
@add_tags: Add the tags entered under “Value”,
@del_tags: Delete the tags entered under “Value”,
@rpl_tags: Delete and replace the existing tags with the tags entered under “Value”.
Value: You must fill in the tags to be added or deleted, separating them with commas, without spaces, and the entire entry must be surrounded by inverted commas. For example: ‘Routage1,Routage2’
Note: you can only add tabs created in the Tags tab.
Place the tag variables where you want the call to receive a tag, and where it is to be visible on the operator toolbar.
2. Filter calls in relation to tags

Select “Tags” in the “Filter by” dropdown menu. Under “Name”, indicate the tags by which you would like to filter calls, and that are already linked to a call.
Add as many rows of filters as you have tags. Under “Filter” you will have to filter calls using “True” and “False”, depending on where the call must go. For example: You have entered Routing1 and Routing2 under “Name”. If you put true,false in a first filter, and step4, the call will be sent to step5 if the “Routing1” tag is linked to the call. If you enter false,true, the call will be redirected to another step if the Routing2 tag is linked to the call.
3 - Use of tags in the operator toolbar
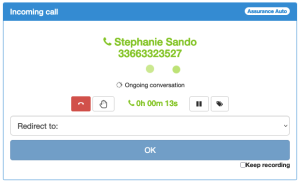
In the operator toolbar, during a call, the “Tags” icon will appear. This will allow you to categorise the call in order to find it more easily in the statistics, or to sort calls so that they can be listened to again, for example.
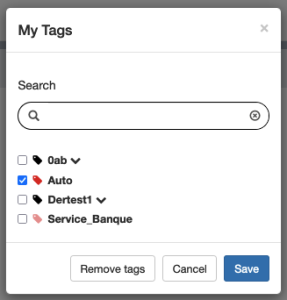
When you are on a call, click on the “Tags” icon. All of the tags created from the administrator interface will be displayed. Select the desired tags.
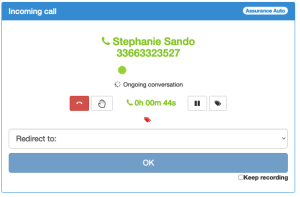
The tags will be displayed on your banner during a call.
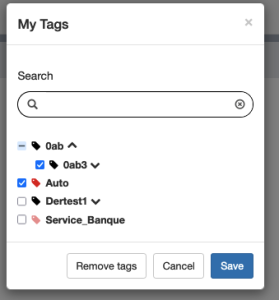
The tags tree allows you to find your tags grouped under the parent tag. A parent tag will have an acronym that allows you to reduce or expand the list of sub-tags. To select all of the sub-tags, just click on the title of the parent tag. When a sub-tag is checked in the list, the main tag box will be crossed out to indicate this.
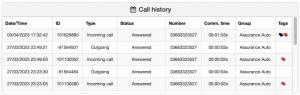
When the call is ended, the tags will be visible in your call history. If you have not had the time to tag a call, or if you wish to change the tag for the call, this can be performed at any time in your call history.
3 - Find tagged calls
When a tag is linked to a call, you can find it in several places within the administrator interface.
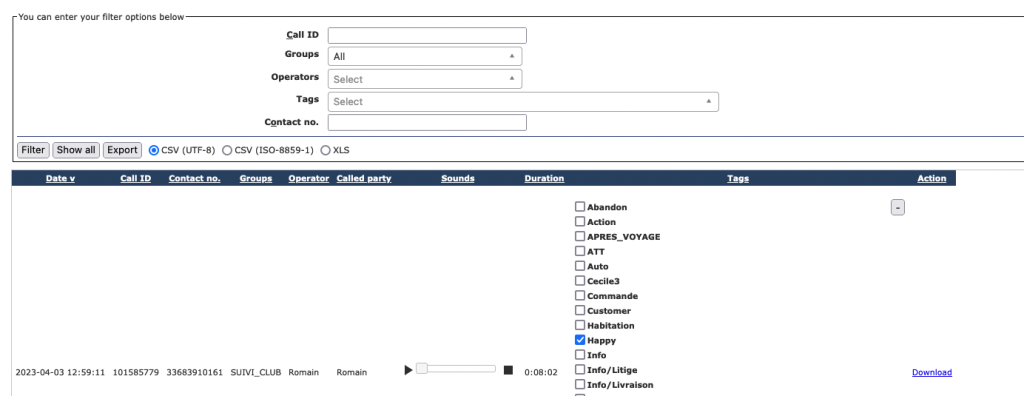
– In the “Sounds” part: Find the tags in your call recordings. A filter will allow you to easily find your tags. Once the call has been listened to, you can change the tags. For example, if you have a call tagged “To be listened to”, you can change the tag to “Ok”.
– In the “Statistics” part:
Incoming calls > History
Incoming calls > Summary
Operators > History
For each statistic, you can easily find tags using the filters, or by exporting the file.
- Table of Contents