Voice Management Guide
The Voice Management user guide
- To start
- Prerequisite
- Home
- Administrator
- Importing sounds to your IVR
- Creating a routing
- Importing a directory
- Prohibit transfers to certain numbers
- Creation of a skill group
- Creation of an operator toolbar
- Gestion of an operator
- Creation of an IVR
- Satisfaction survey
- Campaign
- Webcallback
- Link WebCallBack
- Generating a WebCallBack link
- Gestion of a supervisor
- SMS service
- SMS in the operator toolbar
- SMS in the operator toolbar
- Statistics
- Operator
- Supervisor
- Technical side
- API
- SSO authentification
- Call recording
- Integration
- Application setup (Microsoft Dynamics)
- easiware integration
- Salesforce
- Zendesk
WebRTC integrated into Voice Management
1 - Voice Management WebRTC
1.1 - Activation of the WebRTC in Voice Management
Axialys offers customers who have subscribed to Voice Management and to Centrex the ability to make phone calls directly from their web browser, using WebRTC technology.
This form of usage requires that several requirements be fulfilled:
- Network compatibility (ports, proxy…)
- Centrex configuration
- Voice Management configuration
1.2 Browser and equipment
The WebRTC feature requires the Google Chrome (up-to-date) or Mozilla Firefox (up-to-date) browser.
You must also have a correctly configured (headset/micro-type) audio device on the computer.
1.3 Prerequisite – Network compatibility
If your network is configured to authorise logins from computer extensions, without restrictions, there is nothing in particular that must be done (as is most commonly the case for operator “boxes”, including Axialys connections).
If your network is filtered, you must open:
- 5061/TCP: SIP TLS, for the use of Zoiper (exclusive of WebRTC).
- 443/TCP: WebRTC WebSocket, for the use of WebRTC in the Voice Management toolbar.
- UDP ports > 10000, identical to normal telephony
Note: if you are using a proxy, it must support WebSocket connections.
2 - Modification of Centrex
You must go to the Centrex administration interface, then to the operator’s account, and change the value from Transport to WS.
The simultaneous use of an SIP extension and a WebRTC client is supported. Note: if the transport value is WS, you can no longer use softphones such as Zoiper.
Switching the account to WebSockets mode disables the traditional SIP functionality and replaces it with SIP TLS functionality. The extensions remotely configured by Axialys manage this mode perfectly (all you have to do is restart the extension so that it adopts the new configuration). Nonetheless, other equipment may require a specific configuration.
3 - Modification of Voice Management
You must go to the Voice Management administration interface, and then to Operators:
- For each operator account:
- you must select Centrex Extension, then check Activate WebRTC Softphone
- you must uncheck the Assumed always logged in option if it has been checked
- In Break Types:
- Add a new break (which will be activated during WebRTC communication)
- Select the new break under Webrtc processing status
The various functions of WebRTC integrated into Voice Management
3.1 - The different functions of WebRTC
Logging into WebRTC when integrated into the operator toolbar
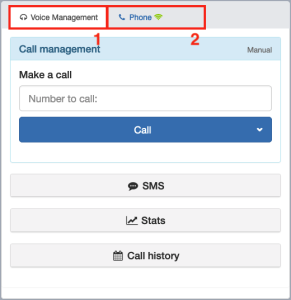
When WebRTC is integrated into the toolbar, log in using the same address as usual, with the same login details. Use of WebRTC allows you to have your telephony integrated directly into your toolbar.
You will have a new tab in your toolbar, with a tab for Voice Management (1) and a tab for Centrex (2)
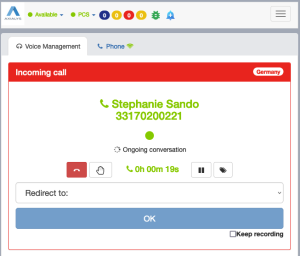
Receiving a call to your operator toolbar

When you receive a call via your toolbar, you can:
- Answer the call by clicking on “Answer”
- Reject the call by clicking on “Hang up”
Being in communication
Once the call has been picked up, you will be in communication via your browser. To familiarise yourself with the use of the operator toolbar, please go to the Call management module.
Receiving a double call on your Centrex line
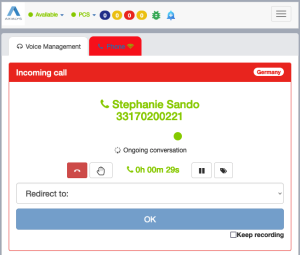
When you are online via Voice Management, you will be able to receive a call directly on your Centrex line. When this double call is received, you will be informed by means of a notification along with a red visual alert on the Centrex tab.
Being on a call in Centrex
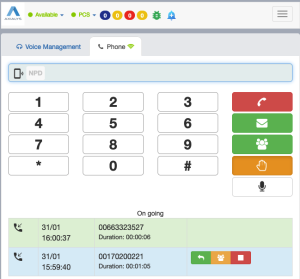
The Centrex part functions in the same was as POPC. Go to the WebRTC/POPC module to familiarise yourself with its use.
4 - Using a Plantronics headset with WebRTC
Installing Plantronics Hub
Go to plantronics.com plantronics.com
and download the version of the software compatible with your work environment (Mac / Windows).
If you are on a MAC: Verify the configurations in “Sound”:
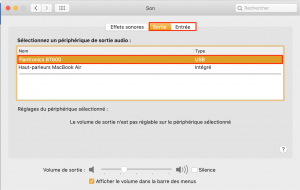
Go to System Preferences, then click on Sound. The audio output and input must be set to the selected headset.
If you are using the Chrome browser:
Verify that you have the Plantronics Blackwire headset in mic by default in order for the solution to function correctly.
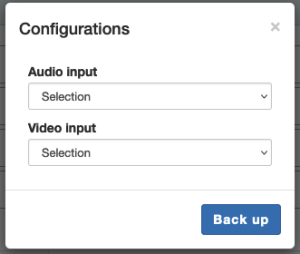
In the POPC interface:

In the POPC interface, click on the Configurations button and indicate the Plantronics headset under “Headset”.
You can now pick up your calls directly from the headset.
In order for the interface to function correctly with the headset, when you select the Plantronics headset in your settings. Your computer’s notifications will be disabled, but the details of the call will be displayed on the interface of your telephone toolbar.
Note: In order for the interface to function correctly with the headset, when you select the Plantronics headset in your settings. Your computer’s notifications will be disabled, but the details of the call will be displayed on the interface of your telephone toolbar.
Note: Depending on the headset models and software versions, it may be that the ringing feature is only functional when set to “all peripherals”. Please contact Plantronics for further details.
Depending on the headset models and software versions, it may be that the ringing feature is only functional when set to “all peripherals”. Please contact Plantronics for further details.
Audio output configurations
This feature can only be used in the Chrome browser and requires WebRTC.
In the operator toolbar, you can configure two different sound outputs, for ringing and for call communication. This will allow you to make the call ring on your computer and automatically take the call via your headset.
In the Telephone part of your operator toolbar, click on the configurations button.
- Headset: If you are using a Plantronics headset, choose Plantronics. If not, enter “None”.
- Ringing audio output: Please select “Default – Speakers”
- Communication audio output: Please select “Default – External headphones”
You may be asked to make the same choice twice – this is due to the browser but has no impact on the function of the solution.
If you are a MacBook user, you must pay attention to the configuration of your computer. Specifically, you must go to "System preferences" > "Sound" > "Output" > "MacBook Air Speaker".
- Table of contents