Voice Management Guide
The Voice Management user guide
- To start
- Prerequisite
- Home
- Administrator
- Importing sounds to your IVR
- Creating a routing
- Importing a directory
- Prohibit transfers to certain numbers
- Creation of a skill group
- Creation of an operator toolbar
- Gestion of an operator
- Creation of an IVR
- Satisfaction survey
- Campaign
- Webcallback
- Link WebCallBack
- Generating a WebCallBack link
- Gestion of a supervisor
- SMS service
- SMS in the operator toolbar
- SMS in the operator toolbar
- Statistics
- Operator
- Supervisor
- Technical side
- API
- SSO authentification
- Call recording
- Integration
- Application setup (Microsoft Dynamics)
- easiware integration
- Salesforce
- Zendesk
The request stage in the IVR
1 - Adding a request stage

The request stage allows you to call your WebServices in order to determine the routing that the call will take.
For example: If your IVR requests that your customer enter his/her order number, a request will be made to your service to find out the status of the order and, depending on this status, to forward the call to the correct step.
There will be various protocols for the exchange of information:`
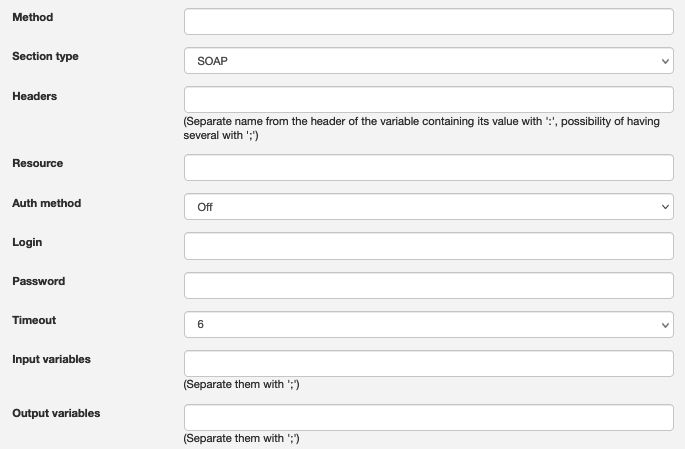
SOAP:
- Method: Method for the resource to be called (e.g. order_status)
- Resource: WSDL address of the SOAP resource (e.g.: http://www.axialys.com/soap.php?wsdl)
- Input variables: All of the data that will be sent to you must be filled in (cf. pre-saved variables). The variables must be separated by “;”.
- Output variables: These will be the variables in which the variables you send will be stored. The variables must be separated by “;”. Note: these cannot be pre-saved variables.
- The variables will be linked in the order you have entered them.
GET:
- Method: Not used
- Resource: Address of the page to be called
- Input variable: The variables must be separated by ; = Enter all of the data that you want to send to the customer (cf. pre-saved variables)
- Output variable: 2 possibilities:
- You can provide the list of variables that you want Axialys to initialise with the values sent by your web service. If you define two variables: the page returned must have only two rows, in the same order as the entered variables
- (Preferred method) You can use the @json method, which allows you to return data in the form of an object in json format. The various settings for this object are accessible, with variables in the form of the representation of a hierarchical display with points.
- For example:
{“file”:{“tel”:”33618000000″, “cmd”:”45674154″, “status”:”sent”}, “return”:”OK”}
file.tel = “33618000000”
file.cmd = “45674154”
file.status = “sent”
return = “OK”
All you have to do is assign variable status to a “filtering” step in order to send to the correct step depending on the status.
You must enter the resource part after the address, and the request part after all of the variables, replacing the value “%s”, which will be replaced by the value of the variable[MR1] . E.g. http://?var1=%s&var2=%s …
POST: This protocol adopts the same logic as GET. The variables will be sent in POST format (not in the URL)
The difference between POST and GET: for the GET protocol, you must enter the variables at resource level, which is not the case with POST.
Example of a page that can be configured:
- https://axialys.com/statut_commande?num=%s&e164=%s
- variables: cmd;@e164_caller
- Thus, in the address, you must define all of the variables separated by “&” and the value “%s”. All of the “%s” will be replaced by the value.
- What will actually be called will then be, for example: https://axialys.com/statut_commande?num=5456484&e164=33618221822
- if cmd = 5456484 & the caller number is 33618221822
2 – Example of using the query step
The query step will be used if you want to automatically play a message to a caller based on their order number or their phone number, for example.
Find an example below of how to easily create connections between the caller and your database.

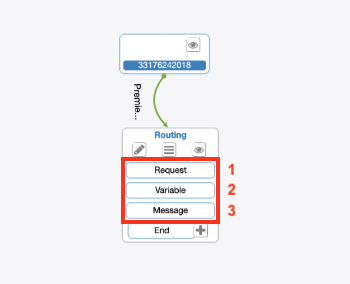
Step 1 – Query

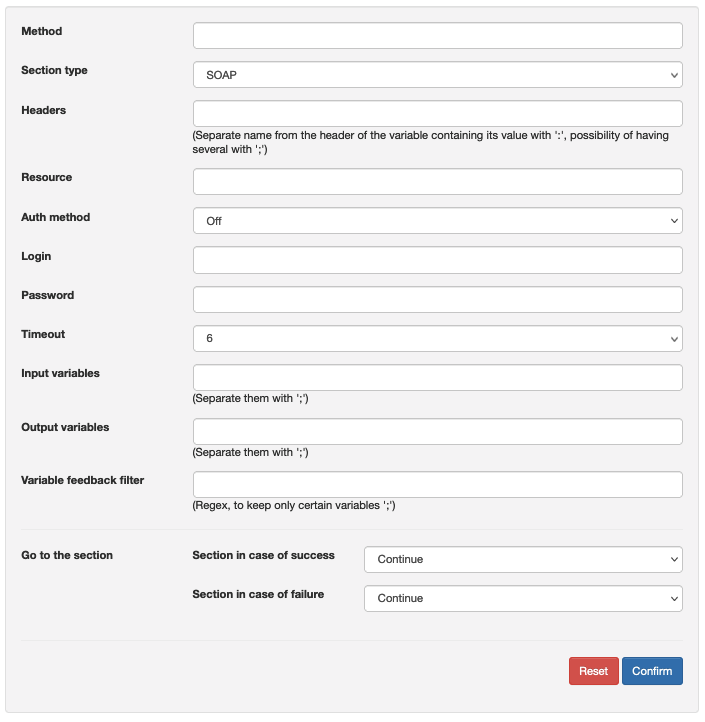
- Query: GET section type
- Header: Variables sent at the beginning, this data is followed by the body (payload)
- Resource: Link for the page that will be called to retrieve the data (database)
- Input variable: Data that we are going to send
- Output variable: Data that we retrieve and that we will convert to json format
Step 2 – Query

- Variable name: Give the variable a name
- Value: We store what comes back from the variable and in the next step, “Message”, we will read this variable
Step 3 - Message

- Sound type: What kind of message will be played, in this case “Summary” will be used for our example because we are going to read data
- Variable: To read what was stored in the variable
- Table of Contents