Voice Management Guide
The Voice Management user guide
- To start
- Prerequisite
- Home
- Administrator
- Importing sounds to your IVR
- Creating a routing
- Importing a directory
- Prohibit transfers to certain numbers
- Creation of a skill group
- Creation of an operator toolbar
- Gestion of an operator
- Creation of an IVR
- Satisfaction survey
- Campaign
- Gestion of a supervisor
- Webcallback
- Link WebCallBack
- Generating a WebCallBack link
- SMS service
- SMS in the operator toolbar
- SMS in the operator toolbar
- Statistics
- Operator
- Supervisor
- Technical side
- API
- SSO authentification
- Call recording
- Integration
- Application setup (Microsoft Dynamics)
- easiware integration
- Salesforce
- Zendesk
Creation of an IVR
1 - Creation of an IVR
The aim of this module is to outline the stages in the creation of a simple IVR (working hours, messages, menus, groups). For further details on each stage, please go to the corresponding modules.
To set up an IVR (Interactive Voice Server) for your Contact Centre, go to your Administrator interface, “Steps” tab.
An IVR consists of several steps (1), which in turn consist of several stages (2). A step is equivalent to a calling level in your IVR.
You in fact start off with a 1st level with your schedules, which then leads on to a 2nd level, which will be different depending on whether you are open or closed: it may be a closing message or a menu (thus resulting in 2 steps, before which either the call will go to a closing message, or to the menu). The level 2 menu can be linked to a redirect to a group of operators who will respond to the calls – this redirect will be level 3 of your IVR. There will therefore be 4 steps: the working hours, the closing message, the menu and the group.
In each step, you can configure the stages.
For example, if you want to have a welcome message before the caller hears the various menu choices, you can have a (welcome) “message” stage, followed by a menu stage (with various choices).
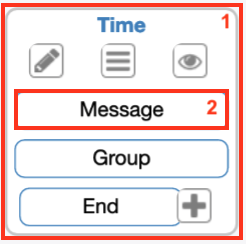
Each step gives you the ability to:
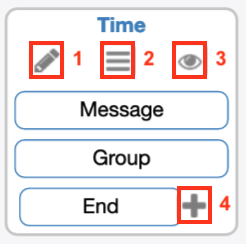
- Edit the step
- Change the order of the stages
- Display or hide the arrows that link the steps
- Add one or more stages
When you first log in, you will be asked if you wish to access the “old” or the “new version”. This guide is based on the “new version” for the display of the IVR, which is more graphic in terms of design.
Once in the interface for creating an IVR, click on “new step” to begin your first IVR.
All of the categories can be moved by “Drag and Drop”. To move within your interface, you can zoom in or out using the roller on your mouse, or by clicking and holding to move around within your window.
Each of the linked steps are connected by a coloured arrow. You can make these arrows appear or disappear by clicking on the “eye” icon.
Tip: It is recommended that you create your IVR with its various stages on one sheet, and that you start with the final stages when creating your IVR.
2 - Example IVR
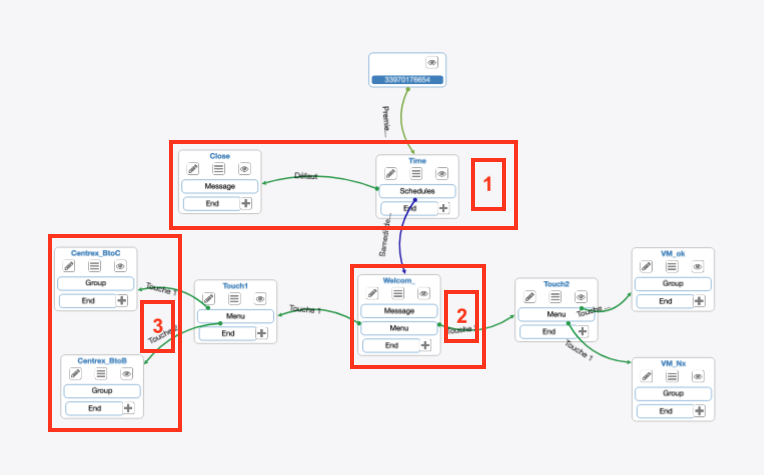
1. Working hours
The first step that makes up your IVA will generally be the working hours of your Contact Centre or of the services to which you want to link your skill groups. The stages for the creation of schedules are described in the “Setting up IVR schedules” module. Choose your opening hours via the “Fixed working hours” block and your closing hours via the “Default step”. Each time, the step to be selected is the step to which the calls are to be directed. If a client calls you during your closing hours, he or she will be directed to the step that you have selected.
In the stated example, in the case of a call during closing hours, the call will be redirected to the “closed” step containing a message stage (module: Integrate a message into the IVR), indicating that the service is currently closed and will call back during working hours. In the event of a call during working hours, the call will be redirected to the “Welcome_menu” step containing a “Welcome to Axialys…” welcome message, as well as a menu stage.
2. Menu
Once the call has passed through the “Working hours” step, and these have been set to the currently valid opening hours, the call will then move on to the “Welcome_menu” step. This consists of two stages:
- Message stage: a message has been integrated in order to welcome the caller, stating the name of the company, for example.
- Menu stage: once the welcome message has been heard, the menu stage (Integrate a Menu into the IVR) will be activated. You will be able to distribute your calls to the appropriate operator, depending on your selected settings.
- In the example, the caller first hears a welcome message, stating the name of the company. In the next stage the caller is offered 2 choices: does he or she wish to discuss the Centrex solution (key in 1 on the telephone) or the Voice Management solution (key in 2 on the telephone).
3. Linking with an appropriate operator
When the caller has selected what he or she wishes to discuss – Centrex in the provided example – by pressing the corresponding key on his or her phone, the call is then directed to the corresponding step. For the 1 key, a new message was configured, ending the call. For 2, the call is redirected to a step containing a message stage, stating that he/she will be connected with an operator, and a group stage. In the group stage (module: Linking an operator group to an IVR), the appropriate group has been linked in order to answer the caller’s questions. You will find all of the previously created groups in this stage.
Once the caller has been connected to the operator, the IVR comes to an end.
- Table of Contents