Voice Management Guide
The Voice Management user guide
- To start
- Prerequisite
- Home
- Administrator
- Importing sounds to your IVR
- Creating a routing
- Importing a directory
- Prohibit transfers to certain numbers
- Creation of a skill group
- Creation of an operator toolbar
- Gestion of an operator
- Creation of an IVR
- Satisfaction survey
- Campaign
- Webcallback
- Link WebCallBack
- Generating a WebCallBack link
- Gestion of a supervisor
- SMS service
- SMS in the operator toolbar
- SMS in the operator toolbar
- Statistics
- Operator
- Supervisor
- Technical side
- API
- SSO authentification
- Call recording
- Integration
- Application setup (Microsoft Dynamics)
- easiware integration
- Salesforce
- Zendesk
Generating a WebCallBack link
1 - What is a WebCallBack link
A Web Callback link will enable you to create and provide your customers and contacts with a web page so they can call you directly from an internet browser.
You can set up this callback page so they contact you via a centrex account or on your Voice Management solution (IVR, Group, etc.)
This extremely useful link can be added to a website or even an email signature!
2 - Creating the URL
You have the option to create the URL you want, and there are two options for this:
You have your own subdomain name. You need to configure your DNS server to point to our two machines:
{subdomain} IN A 217.146.224.157
{subdomain} IN A 217.146.224.164
You do not have your own subdomain. This means you have the option of choosing between the following domain names:
etstalkto.me
onsappelle.audio
onsappelle.video
appel.audio
appelvisio.net
appelvisio.click
callus.video
clicktotalk.to
Your address will be for example:
To configure the domain name, contact your Customer Success Manager at: [email protected]. This step is mandatory
3 - View/Edit links
To access your Web Callback links, go to your administrator interface and click “Callback link“.
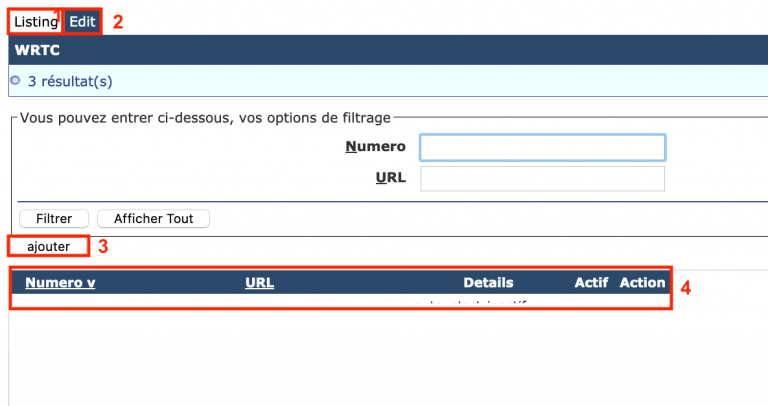
1 – See the complete list of all your numbers attached to a URL link
2 – 3 – Add a new Web Callback page
4 – Find the list of your Web Callback pages that you can edit
4 - Add a Web Callback link
When you click “edit” or “add”, an interface enables you to configure this new page:
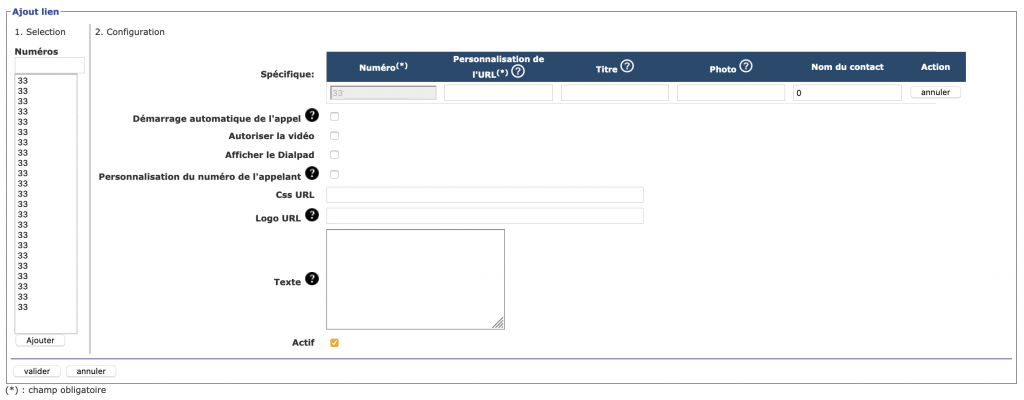
| Title | Action |
|---|---|
|
Numbers |
Choose one or more numbers (click and drag the mouse over the numbers you want) then click “Add”. For each number a “Specific” line is added |
|
URL customisation |
This field is mandatory and unique for each number. This is what will be displayed after your URL. Ex: .onsappelle.audio/ |
|
Title |
Name that will display on the tab name |
|
Photo |
URL link show you can display your photo or avatar on the banner (max size: 96x96px ) |
|
Contact name |
Name that will appear on the CallBack banner |
|
Action |
Undo configurations |
|
Automatic call start |
When the user arrives on your Callback page, the call will start automatically |
|
Enable video |
Enable the user to make a video call (Beta version, contact your Customer Success Manager: [email protected] if you want to activate it. Using video may incur an additional cost) |
|
Show Dialpad |
Display the Dialpad on your Callback banner |
|
Customising the caller's number |
Enable the internet user to display their number on the telephone receiving the call. If the user doesn’t customise their number, the service number will be displayed instead |
|
Css URL |
Customise your banner’s graphic interface |
|
Logo URL |
Display your company logo (max size: 328x40px) |
|
Text |
Display text on your banner (ex: your status) |
|
Active |
Enable or disable this Callback |
Remember to first choose the number or numbers that you
want to create a Web Callback page for and click “Add”
so that you can then configure the desired URLs for each of them. Page
creation is not immediate, you must wait 10 minutes
before it is active.
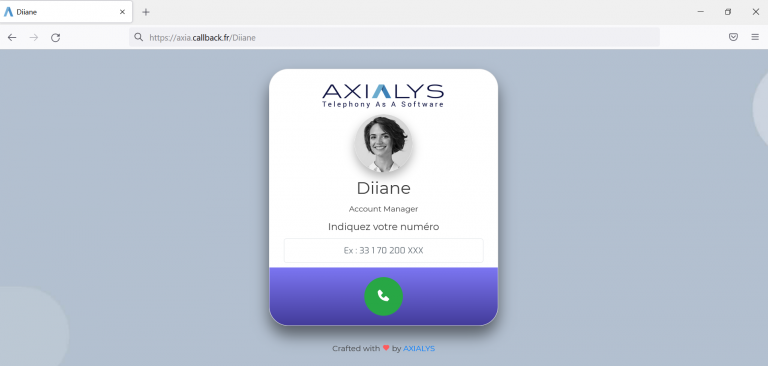
5 - Using the Callback banner
Each of the Web Callback pages thus created will have a banner that gives the internet user browsing them a means of contacting you.
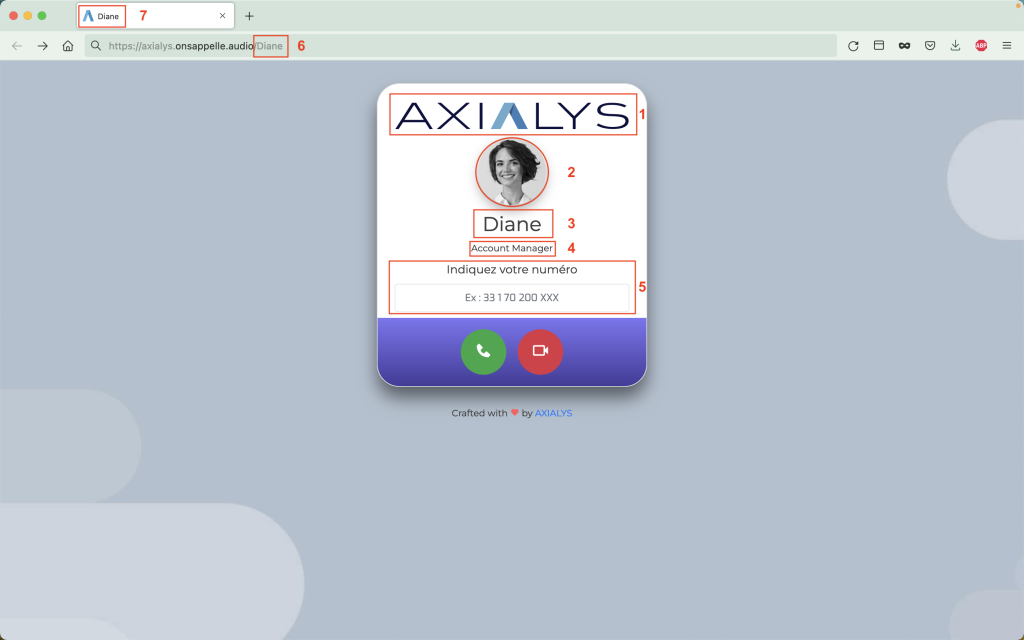
1 – Company logo for customisation
2 – Avatar for customisation
3 – Contact name
4 – Text for customisation
5 – Customisation of the caller’s number
6 – Dialpad (Enable/Disable)
7 – Customisation of the URL
8 – Title
How the banner works

When the user arrives on the page, they can (depending on your settings) call with just one click.
In audio call, so by clicking on the green phone

In video call, so by clicking on the red camera
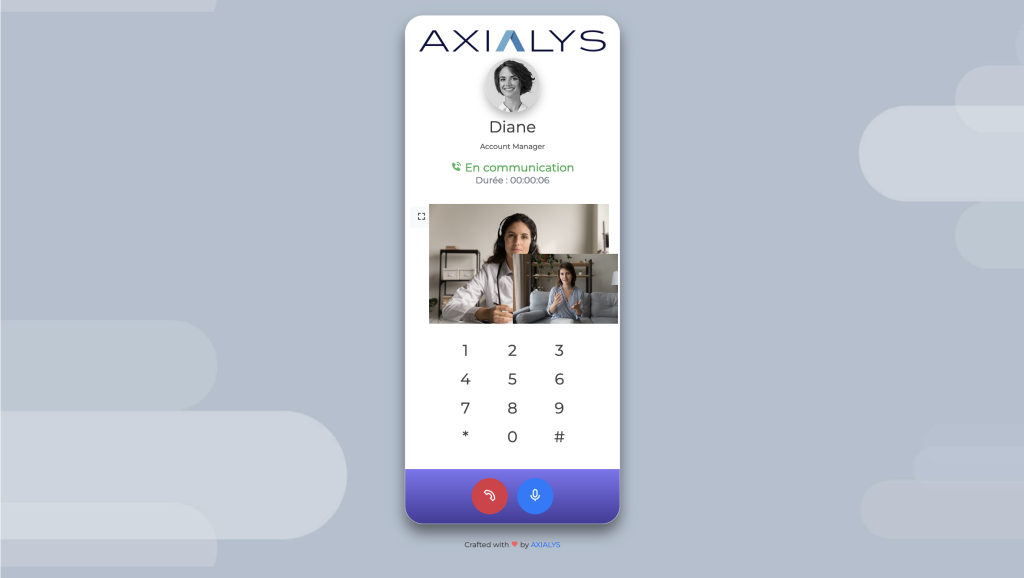
They enter into communication, and the time of the call is logged.
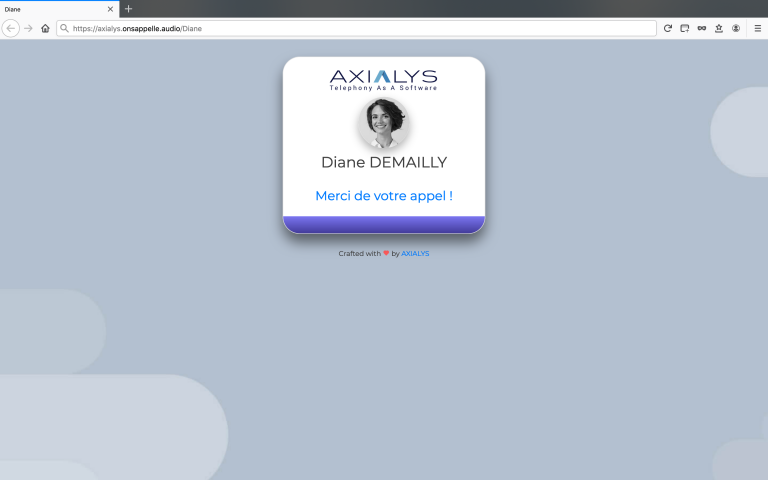
When the call ends, a “thanks for the call” message is played.
- Table of contents