Voice Management Guide
The Voice Management user guide
- To start
- Prerequisite
- Home
- Administrator
- Importing sounds to your IVR
- Creating a routing
- Importing a directory
- Prohibit transfers to certain numbers
- Creation of a skill group
- Creation of an operator toolbar
- Gestion of an operator
- Creation of an IVR
- Satisfaction survey
- Campaign
- Webcallback
- Link WebCallBack
- Generating a WebCallBack link
- Gestion of a supervisor
- SMS service
- SMS in the operator toolbar
- SMS in the operator toolbar
- Statistics
- Operator
- Supervisor
- Technical side
- API
- SSO authentification
- Call recording
- Integration
- Application setup (Microsoft Dynamics)
- easiware integration
- Salesforce
- Zendesk
Create, modify or delete your operator toolbars
Stage 1 – Creation of an operator toolbar
To create a new operator, please go to the “Operators” tab in your Administrator interface. Click on “Add operator”.
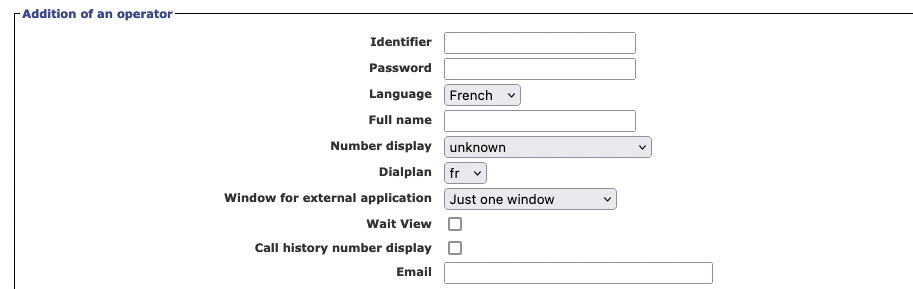
You will then be able to fill in all of the various pieces of information regarding your operator:
- Identifier: we recommend that you use the first letter of the first name, along with the surname.
- Password: the password is not displayed. When creating an operator, the password is sent directly to the operator by email.
- Language: define the language for the operator toolbar (French, English, Italian, Spanish).
- Full name: the full name is mandatory – this is what will be displayed on the supervision interface in the information regarding operators.
- Number display (during outgoing calls if the operator doesn’t choose a group):
- Anonymous: the number is displayed privately on the screen of the call recipient,
- OP number: the number displayed is the operator’s direct line number,
- CTI incoming: the number displayed to the call recipient, which forms part of the platform,
- Personalised: the administrator can personalise the number that is displayed.
- Window for the external application: functions alongside the current URL and allows you to choose whether or not to open one or several windows in the event of (an) incoming call(s).
- Hide window: all calls will be opened in the same window.
- Single window: a single pop-up window opens for all incoming calls. This is automatically updated with each new incoming call (the number displayed is replaced by that of the next caller).
- Several windows: a new window opens with each call.
- Multiple windows per case: there is a new window for each call, however, if there are several windows that include the VM toolbar, only a single window is opened.
- Several tabs: a new tab opens with each call.
- Multiple tabs per case: there is a new tab for each call, however, if there are several tabs that include the VM toolbar, only a single tab is opened.
- Wait view: allows you to view the number of people waiting in each of the queues to which the operator is assigned.
- Call history number display: choose whether or not to display the telephone numbers in the history of the last 50 calls, which is accessed via the operator toolbar.
- Email: the email address is mandatory if you are to create an agent. The latter will receive his password to this email address.
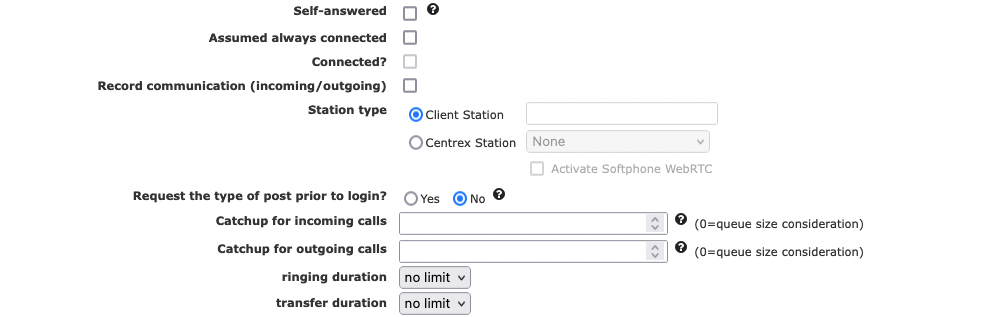
- Self-answer: Used to automatically pick up a call without operator action. Please note, only works with WebRTC.
- Assumed always connected: the operator is always considered available to receive calls, even if he is not logged into his toolbar. The supervisor will see the operator as online, marked “Out of toolbar” if the operator is not logged into his toolbar but this option is checked.
- Record communication: whether or not to record your operators’ conversations (incoming/outgoing). All persons who may be recorded (operator or caller/call recipient) must be informed accordingly.
- Station type: enables the linking of numbers to agents.
- Client station: number at which the operator will receive calls (e.g.: 33170200200 for a French number).
- Centrex station: Centrex account in which the operator will receive his calls
- Request the type of post prior to login?: When the operator logs into his toolbar, he/she will be required to enter his/her number for receiving calls. If the number is not entered, the operator will be timed out
- Catchup (post-call processing time): if Catchup is configured on an agent level, the Catchup configured on the group level is not taken into account
- Ringing duration: to determine the telephone ringing time (4 rings = 25 seconds)
- Transfer duration: To determine the transfer ring time (the ring time takes precedence over the transfer time).
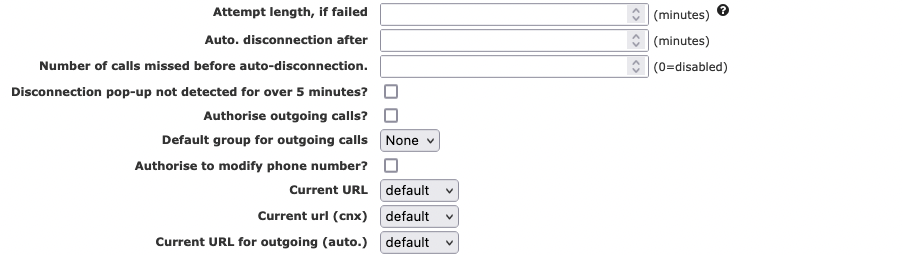
- Attempt length, if failed: if the operator does not respond to a call, he will then be ignored for this period of time.
- Auto. disconnection after: maximum waiting time in minutes prior to automatic logout.
- Number of calls missed before auto-disconnection: upon exceeding the configured number of calls, the operator will be automatically logged out.
- Disconnection pop-up not detected for over 5 minutes ? if Voice Management does not detect any notifications (activity in the toolbar, incoming/outgoing calls…) for 5 mins, it will be automatically logged out. Note: if you have the employee softphone, this option will be automatically checked. This will allow the toolbar to log out if the operator’s PC goes into standby mode, for example.
- Authorise outgoing calls: if an operator has only been assigned the task of receiving calls, you can block him/her from making outgoing calls.
- Authorise to modify phone number: authorises the operator to change the number at which he/she wishes to be called.
- Current URL: enables a call from the client webpage via Axialys during an incoming call. Only the technical team has access to this setting.
- Current URL for outgoing (auto.): enables a call from the client webpage via Axialys during an outgoing call. Only the technical team has access to this setting.

- Auto. disconnection to: Enables the configuration of an automatic agent logout at a configured time.
- Close the session when closing a window in an iframe: activate this option if you are integrated into a CRM that only uses one page without the unwanted reloading of the page.
- Persistent connection session: checking this box means that the operator’s toolbar will only log out if the operator clicks on “logout”. If he/she simply closes his/her browser window, he/she will not be logged out.
- Set to idle upon login: when the operator logs into his/her toolbar, he/she will automatically be placed on a break and will not be able to receive calls until he/she sets his/her status to Available.
By default, operators are never logged out of the toolbar. Operators are automatically logged out at 23:59 pm. To amend this default setting, click on “Log out if there are no notifications for more than 5 minutes?”
If you set the two toolbar login features to Unavailable, the break that will be taken into account can be configured in the “Break Types” tab under “Login status“. See the Managing operator breaks module.
Create or modify operators on a mass scale
You can import or modify multiple operators via an Excel file. To do so, click on “Add/modify multiple operators”.

Once you have clicked on the button, you are taken to a page that allows you to download a template. You can download the files from existing operators or download a clean file.
Once your have downloaded the file, all of the headings will be displayed in the first row. Complete or amend the following rows as required and then save the file. Import the file by clicking on “Choose a file”, then on “Validate”. You will receive confirmation that your file has been imported, row-by-row. If there is an error, a message will notify you
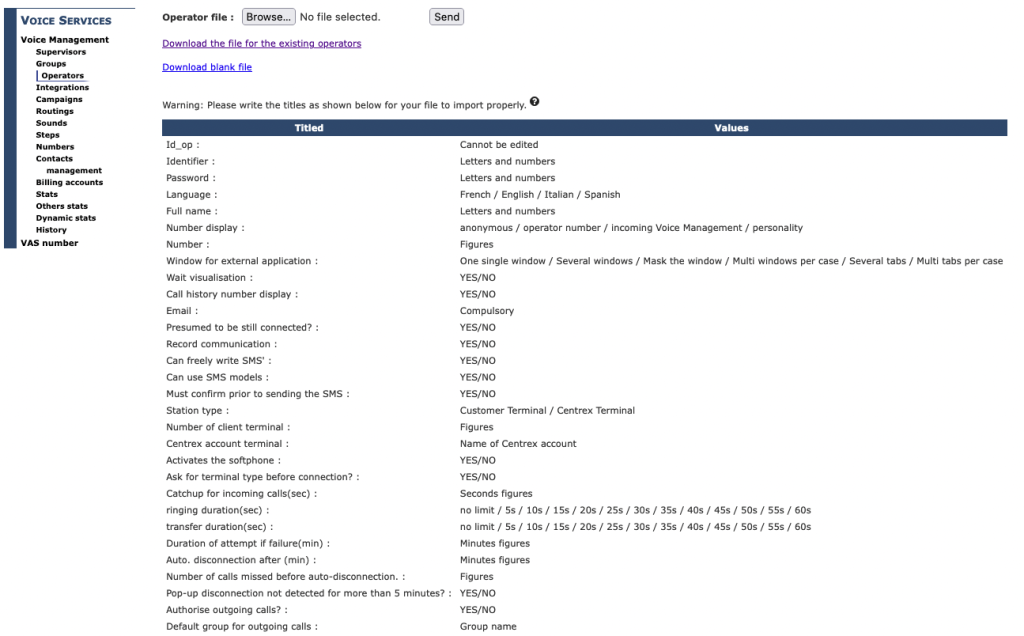
On the interface, you have all of the headings, along with the possible responses. Note: please respect the heading to the letter so that your operator import works correctly. If you copy/paste a line from an already existing operator, please delete the operator ID. In fact, this will modify the existing operator. To create a new operator, you can leave the “non-modifiable” boxes empty.
Note: this feature only allows you to add or change operators. You do not have the ability to delete lines via the file.
- Table des matières